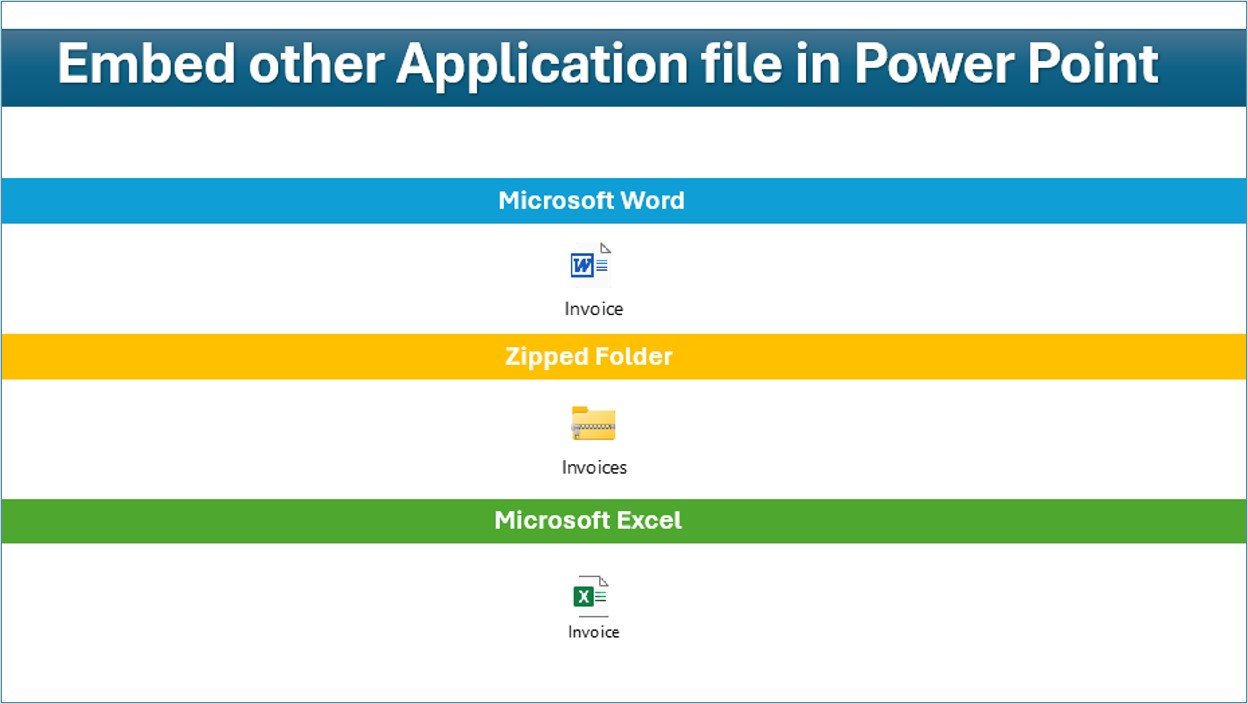
Need to hand over a spreadsheet, PDF or Word document together with your slides? You can embed files into PowerPoint so they travel inside the presentation and open with a double-click. This guide shows the exact steps in PowerPoint for Windows, how to show the file as a clean icon with your own caption, and when to embed versus link.
It is written for anyone who presents reports, proposals or training material: analysts attaching the Excel workings behind a chart, trainers sharing handouts, or sales teams packaging a price list with a pitch deck. The steps use the Insert > Object command and the Insert Object dialog.
🎥 Watch the Video Tutorial
Quick Answer
Go to Insert > Object (in the Text group), select Create from file, click Browse… to choose your file, tick Display as icon, optionally click Change Icon… to set a caption, and click OK.
How to Embed Files into PowerPoint: Step by Step
Step 1: Open the Insert tab and click Object
Open your presentation and select the slide where the file should appear. On the Insert tab, look at the Text group on the right. The Object command is the small icon at the bottom of the stacked buttons next to WordArt (hover over it to see the name “Object”).

Step 2: Choose “Create from file”
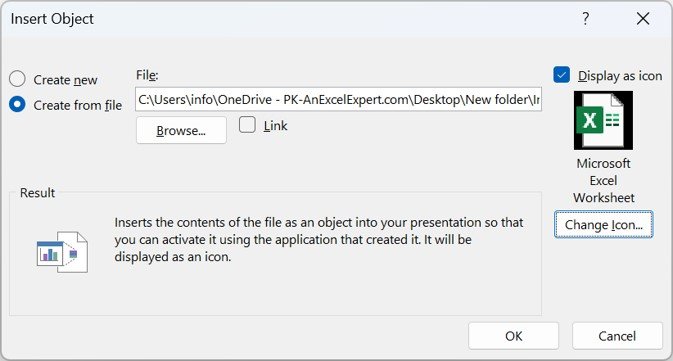
The Insert Object dialog opens with two options on the left: Create new and Create from file. Select Create from file, because you want to use a file that already exists on your computer.
Step 3: Browse to your file
Click Browse…, find the file and click OK (or Open). The path appears in the File box.
Step 4: Decide on “Link” and tick “Display as icon”
Leave Link unticked to embed a full copy of the file inside the presentation. Tick Display as icon so the slide shows a neat file icon instead of a preview of the first page. The Result box confirms what will happen: the contents are inserted as an object you can open with the application that created it, displayed as an icon.
Step 5: Change the icon and caption
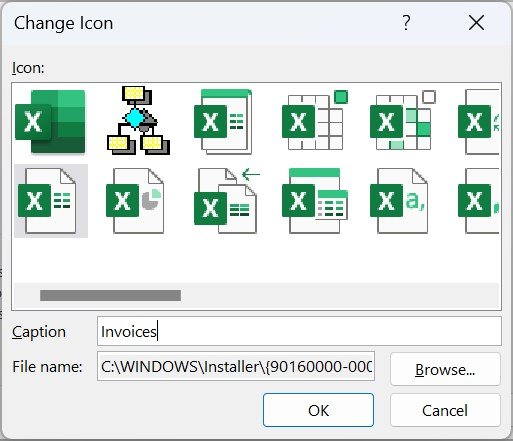
Click Change Icon…. In the Change Icon window, pick an icon from the list and type a clear label in the Caption box. By default the caption is the file type (for example “Microsoft Excel Worksheet”), which tells your audience nothing; a caption such as “Invoices” or “Q3 Sales Workings” is far more useful.
Step 6: Click OK and test it
Click OK in both dialogs. The icon appears on your slide; drag it into position. Double-click it in Normal view to confirm the file opens in its own application.
Worked Example: Attach the Invoice Workbook to a Finance Slide
Say your slide summarises outstanding invoices and the finance team will want the detail. Follow the steps above with the Excel invoice file, keep Link unticked, tick Display as icon, and set the caption to Invoices. The slide now carries a small Excel icon labelled “Invoices”. Anyone who receives the .pptx can double-click it and see the full workbook, even if they never had access to your folders. Expect the presentation file to grow by roughly the size of the workbook.
Embed vs Link vs Hyperlink
| Method | How | File size | Updates when source changes? | Best for |
|---|---|---|---|---|
| Embed | Insert > Object, Create from file, Link unticked | Grows by the file’s size | No, it is a snapshot copy | Sending a self-contained deck |
| Link | Same, but tick Link | Stays small | Yes, from the original path | Live data on your own PC or shared drive |
| Hyperlink | Insert > Link to a file or web address | Stays small | Always opens the current file | Cloud files in OneDrive or SharePoint |
Useful Variations
- Show a live preview instead of an icon: leave Display as icon unticked. For an Excel file, the slide shows a picture of the sheet, and double-clicking lets you edit it inside PowerPoint.
- Create a new embedded worksheet: choose Create new and pick an object type such as a Microsoft Excel Worksheet to build a small table directly on the slide.
- Open the file during a slide show: select the icon, go to Insert > Action, and under Object action choose Open. A click during the show will then open the file.
- Embed several files: repeat the steps and line the icons up with Home > Arrange > Align for a tidy “Attachments” slide at the end.
Common Problems and Fixes
- The Object button is missing or greyed out: you are probably in PowerPoint for the web, which does not offer Insert Object. Open the presentation in the PowerPoint desktop app and try again.
- “The server application, source file, or item can’t be found”: the program needed to open that file type is not installed on this computer, or a linked file has been moved. Install the app or re-insert the file.
- The embedded file does not show my latest changes: embedding stores a copy. Delete the icon and embed the new version, or use Link instead.
- Presentation is too big to email: embedded files add their full size. Compress images, or share large files with a hyperlink to a cloud copy.
- Recipient on a phone or in a browser cannot open it: embedded objects need desktop Office to open. Add a hyperlink as a backup.
Tips
- Always write a caption that says what the file is, not what type it is.
- Put embedded files on a final “Appendix” or “Attachments” slide so they do not distract during the talk.
- Test the deck on another computer before sending it.
- Remove confidential sheets from a workbook before embedding; the whole file goes with the deck.
For more PowerPoint techniques, see how to build a data-driven 3D container chart in PowerPoint, create quick professional slides with PowerPoint Designer, and speed up PowerPoint creation with ChatGPT. Working in Word as well? Our guide to three easy ways to create a table in MS Word covers another everyday Office task.
Frequently Asked Questions
How do I embed an Excel file in PowerPoint?
Use Insert > Object > Create from file, browse to the workbook, tick Display as icon if you want an icon, and click OK. Double-click the icon to open the workbook.
Can I embed a PDF in PowerPoint?
Yes, with the same steps. To open it, the viewer’s computer needs a PDF program that registers itself for embedded objects, such as Adobe Acrobat Reader.
What is the difference between embedding and linking?
Embedding stores a copy inside the .pptx, so it works anywhere but does not update. Linking stores only the path, so it updates but breaks if the file moves or the recipient cannot reach that location.
Does embedding a file increase the PowerPoint file size?
Yes, by about the size of the embedded file. Linking or a hyperlink keeps the presentation small.
Can I embed files in PowerPoint for the web or on a Mac?
The Insert Object workflow described here is a feature of the desktop app for Windows. PowerPoint for the web does not offer it, and the Mac version has more limited support, so test the deck on the device you will present from.
How do I change the icon caption later?
Right-click the icon, choose the Object option (for example Worksheet Object > Convert…), tick Display as icon and click Change Icon… to edit the caption.
Wrapping Up
Embedding is the simplest way to keep supporting files and slides together. Next time you send a deck, add an attachments slide, embed the workbook or document with a clear caption, and test it once before you hit send.
📅 Last updated: October 2026