Event planning can be a complex and time-consuming process, but with the right tools, it can become a streamlined and organized endeavor. Google Sheets, a free, accessible tool, can be an invaluable resource for planning events and tracking the associated budgets. In this detailed guide, we’ll walk you through how to use Google Sheets effectively for both event planning and budget tracking.
Why Google Sheets for Event Planning and Budget Tracking?
Google Sheets offers a variety of benefits for event planning:
- Collaboration: Multiple people can work on the sheet simultaneously, making it ideal for team-based planning.
- Accessibility: Since it’s cloud-based, you can access your event details and budget from anywhere, at any time.
- Customization: Google Sheets can be easily customized to fit your event’s unique needs.

Step 1: Create a New Event Planning Sheet
Start by opening Google Sheets and creating a new spreadsheet. To keep your event planning organized, consider adding separate sheets within the document for different aspects of your event. Here are some recommended sheets to include:
- Event Overview: For general event details such as the date, time, location, and key contacts.
- Guest List: A list of attendees with columns for RSVP status, dietary preferences, and special accommodations.
- Vendors: A sheet to track vendors such as caterers, photographers, entertainers, and more.
- Task List: A detailed to-do list for each phase of event planning, including deadlines and responsible individuals.
- Budget Tracker: A crucial sheet to keep track of all the financial aspects of your event.
Step 2: Set Up Your Event Overview Sheet
The Event Overview sheet provides a snapshot of all critical details. Here’s what you should include:
Columns:
- Event Name: Title of the event.
- Date and Time: When the event will occur.
- Location: Where the event will take place.
- Event Type: Wedding, corporate event, birthday party, etc.
- Coordinator: Name of the main event planner or organizer.
- Contact Info: Contact details for the venue, vendors, and other stakeholders.
- Notes: Any additional important details like theme or special requests.
Step 3: Create Your Guest List
Your guest list sheet will help you keep track of who’s attending, their preferences, and any special requirements. Here’s what you can track:
Columns:
- Name: The full name of the guest.
- RSVP Status: Whether the guest has confirmed attendance (Yes, No, Pending).
- Plus One: Indicate if the guest is bringing a companion.
- Dietary Restrictions: Any food preferences or restrictions (vegetarian, gluten-free, etc.).
- Special Needs: Accommodations like wheelchair access, etc.
- Contact Info: Phone number or email address for easy communication.
Step 4: Track Vendors
This sheet is designed to ensure that you stay organized and keep track of who you’re working with for different event services. Consider including the following:
Columns:
- Vendor Name: Name of the vendor (e.g., catering company, photographer).
- Service Provided: The specific service they are offering (e.g., catering, entertainment).
- Contact Info: Phone number or email address for each vendor.
- Payment Due Date: When the payment to the vendor is due.
- Cost: The agreed-upon cost for the service.
- Paid: Checkboxes to mark if payment has been made.
- Notes: Any special instructions or requirements for the vendor.
Step 5: Organize Your Task List
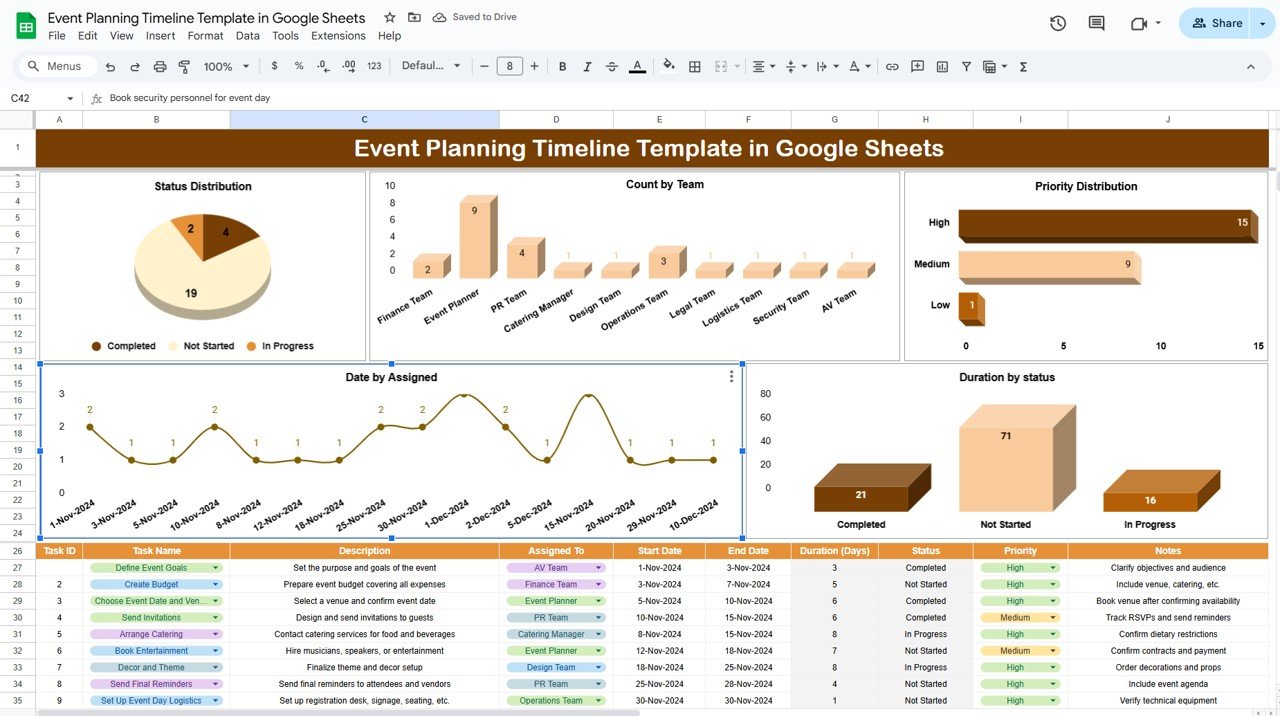
Use this sheet to break down all the tasks that need to be completed before, during, and after the event. You can create categories like Pre-Event, During Event, and Post-Event tasks.
Columns:
- Task: A brief description of the task.
- Category: Pre-event, during event, or post-event.
- Assigned To: The person responsible for completing the task.
- Due Date: The deadline for when the task needs to be completed.
- Status: Whether the task is in progress, completed, or not started.
- Notes: Any extra information related to the task.
Step 6: Set Up a Budget Tracker
The Budget Tracker is essential for staying within financial limits and ensuring everything is accounted for. Here’s how you can break it down:
Columns:
- Expense Category: Break down your event into categories like Venue, Catering, Decorations, Entertainment, etc.
- Estimated Cost: The projected amount for each category.
- Actual Cost: The actual amount spent.
- Difference: The difference between the estimated and actual costs (calculated automatically using a formula like
=C2-D2). - Paid: Checkboxes or notes on whether payment has been made.
- Notes: Any extra information regarding the cost or payment.
For better organization, you can also include a Total Estimated Cost and Total Actual Cost row at the bottom to track your overall budget.
Step 7: Automate Calculations with Google Sheets Functions
To make your event planning and budgeting easier, you can use some of Google Sheets’ built-in functions:
- SUM(): To calculate the total estimated and actual costs.
- IF(): To create conditional formulas, like marking an expense as over budget.
- Data Validation: To create drop-down menus for categories like RSVP Status and Task Status.
- Conditional Formatting: To highlight overdue tasks or expenses that exceed the budget.
Step 8: Collaborate and Share
One of the greatest advantages of using Google Sheets is the ability to collaborate with others. You can share your event planning sheet with team members, vendors, or anyone involved in the event planning process. Simply click the Share button in the top right corner, and enter the email addresses of the people you want to share with. You can give them either View, Comment, or Edit access, depending on their role.
Step 9: Keep Track with Google Sheets on Mobile
With Google Sheets available on mobile devices, you can track your event progress and update the budget anytime, anywhere. Simply download the Google Sheets app and ensure your event details are always on hand.
Step 10: Event Day Checklist
The final sheet should be a checklist for the event day itself. This could include things like:
- Arrival Time: When vendors need to arrive.
- Setup Details: Where tables, chairs, and other supplies should be placed.
- Event Schedule: A timeline of events during the day (e.g., speeches, activities, meals).
- Contact Numbers: Important phone numbers to reach vendors, emergency contacts, etc.
Conclusion
Google Sheets can make your event planning and budget tracking process much more organized and efficient. By creating individual sheets for different aspects of your event and utilizing the powerful features of Google Sheets, you can ensure that your event is planned down to the smallest detail, within budget, and executed seamlessly. Whether you’re planning a small party or a large corporate event, Google Sheets is an indispensable tool to keep everything on track.
Visit our YouTube channel to learn step-by-step video tutorials
Youtube.com/@NeotechNavigators


