Tracking your expenses is a critical part of managing your personal or business finances. Whether you’re aiming to save money, reduce unnecessary spending, or simply keep track of where your money goes, a well-organized expense tracking checklist can make all the difference. The Expense Tracking Checklist in Google Sheets is a powerful tool designed to help you manage and track your expenses efficiently.
In this article, we will explore the features of the Expense Tracking Checklist in Google Sheets, its advantages, and how you can use this template to stay on top of your financial goals.
Why Use an Expense Tracking Checklist in Google Sheets?
Managing your expenses effectively is essential for financial health, and an Expense Tracking Checklist in Google Sheets provides a structured and easy way to do just that. Here’s why it’s worth using:
1. Organized and Simple Structure
Google Sheets offers a clear and easy-to-follow structure for tracking expenses. You can track all your spending in one place, ensuring nothing is left out and no expense goes unaccounted for.
2. Access From Anywhere
As a cloud-based tool, Google Sheets allows you to access your expense tracking template from any device with an internet connection, making it perfect for on-the-go use.
3. Completely Free
Unlike paid apps or software for expense tracking, Google Sheets is free to use. This makes it a cost-effective solution for both personal and business budgeting.
Key Features of the Expense Tracking Checklist in Google Sheets
Let’s dive into the main features that make the Expense Tracking Checklist in Google Sheets an essential tool for managing your finances.
1. Two Worksheets for Better Organization
The template includes two worksheets for ease of use:
-
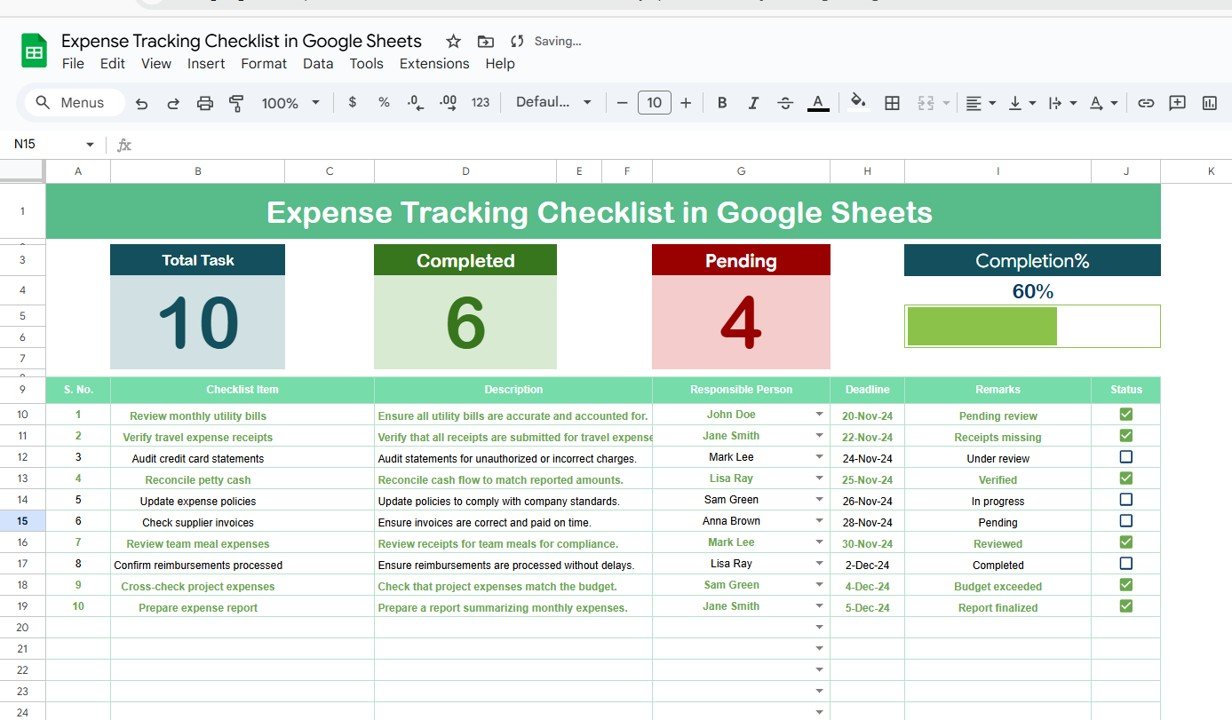
Expense Tracking Checklist Worksheet: This is the primary tab where you enter all your expense-related information. You’ll list all of your expenses, including the amount spent, the category, and other relevant details.
-
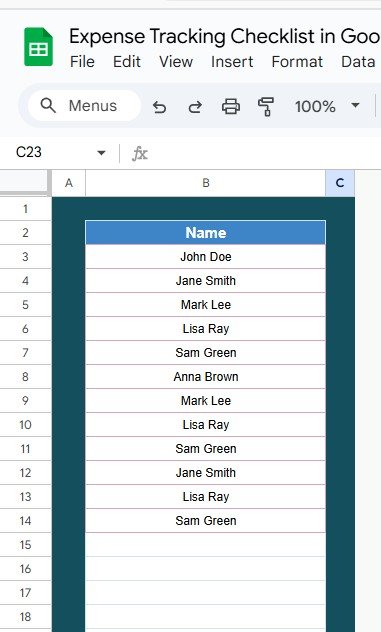
List Worksheet: This worksheet allows you to capture a list of Responsible Persons, which is used to create a drop-down list in the main sheet for easy selection.
2. Top Section: Overview and Progress Tracking
At the top of the Expense Tracking Checklist, you’ll find a summary section that helps you quickly track your progress:
-
Total Count: The total number of expenses listed.
-
Completed Count: The number of expenses that have been processed or reviewed.
-
Pending Count: The number of expenses that still need attention.
-
Progress Bar: A visual representation of how much of your expense tracking is completed, helping you stay on track.

Click to buy Expense Tracking Checklist in Google Sheets
3. Checklist Table: Clear and Structured
The core of the template is the checklist table, where you’ll enter details about each expense. Here are the columns included in the table:
-
Serial No.: A sequential number for easy organization of tasks.
-
Checklist Item: The specific expense or category you are tracking.
-
Description: A brief explanation of the expense.
-
Responsible Person: The individual responsible for managing or reviewing the expense.
-
Deadline: The date by which the expense must be recorded or reviewed.
-
Remarks: Any additional notes about the expense.
-
Status: A checkbox to mark the expense as ✔ completed or ✘ pending.
This simple layout ensures that you can track all of your expenses in an organized manner.

Click to buy Expense Tracking Checklist in Google Sheets
Advantages of Using the Expense Tracking Checklist in Google Sheets
Using the Expense Tracking Checklist in Google Sheets comes with a variety of benefits that can help you manage your expenses effectively:
- Easy to Track and Manage: With clearly organized columns and a simple layout, the checklist makes it easy to track and manage all of your expenses. You can filter by status, date, or category to get a quick overview of your spending.
- Ensures Accountability; By assigning a Responsible Person to each expense, you create accountability. This is particularly useful for businesses where multiple individuals might be handling different expenses.
- Helps Meet Deadlines: The Deadline column ensures that each expense is tracked and reviewed on time. You’ll always know when a particular task is due, reducing the risk of missing important deadlines.
- Progress Monitoring: The built-in Progress Bar helps you monitor the percentage of completed tasks. This visual feedback keeps you motivated and focused on completing your expense tracking efficiently.
Opportunities for Improvement in the Expense Tracking Checklist
While the Expense Tracking Checklist is already a great tool, there are opportunities to make it even more powerful:
- Integrate with Other Financial Tools: You can integrate Google Sheets with other financial tools or use APIs to automate the entry of transactions, reducing manual data entry and ensuring your data is always up to date.
- Add Advanced Formulas; You can use advanced Excel formulas to automatically calculate totals, percentages, or averages for your expenses. This will save time and improve the accuracy of your expense tracking.
- Enhance Collaboration; Google Sheets already allows collaboration, but you could take it a step further by enabling comments on specific entries, making it easier for multiple people to work together on the same document.
Best Practices for Using the Expense Tracking Checklist
Click to buy Expense Tracking Checklist in Google Sheets
To get the most out of your Expense Tracking Checklist in Google Sheets, follow these best practices:
- Update Regularly: Make sure to update your checklist regularly to keep it accurate. You don’t want to fall behind or miss tracking any recent expenses.
- Set Clear Deadlines: For each expense, set realistic deadlines to ensure timely tracking and reviews. This keeps your expense tracking process organized and on schedule.
- Use Conditional Formatting: Use conditional formatting to highlight overdue or high-priority expenses. This visual cue helps you quickly identify which expenses require immediate attention.
- Review and Adjust Monthly: At the end of each month, take time to review your expense tracking checklist and adjust any items as needed. This helps you stay on top of your finances and make informed decisions.
Conclusion
The Expense Tracking Checklist in Google Sheets is a simple yet powerful tool for anyone looking to manage their expenses efficiently. Whether you’re tracking personal spending or handling business finances, this template provides a structured and organized way to keep everything in check. By following the best practices and utilizing the template’s features, you can ensure that your expense tracking process is smooth, efficient, and effective.
Frequently Asked Questions with Answers
Click to buy Expense Tracking Checklist in Google Sheets
1. What are the main benefits of using an Expense Tracking Checklist?
The checklist helps you stay organized, track your spending, meet deadlines, and ensure accountability in managing your expenses.
2. Can I customize the checklist for different expense categories?
Yes, Google Sheets offers full customization. You can adjust columns, categories, and add new items to fit your specific needs.
3. How do I assign a Responsible Person for each expense?
In the Responsible Person column, you can assign a name to each task. You can also create a drop-down list of responsible people using the List Worksheet.
4. Can I access this checklist on my mobile device?
Yes, since Google Sheets is cloud-based, you can access and edit the checklist from any device with an internet connection, including smartphones and tablets.
5. How can I automate expense tracking with Google Sheets?
You can integrate Google Sheets with external tools or use financial APIs to automatically import transaction data, reducing manual data entry.
Visit our YouTube channel to learn step-by-step video tutorials
Youtube.com/@NeotechNavigators
Watch the step-by-step video Demo:


