Are you tired of dealing with messy invoices? If so, you’re in the right place! In this blog post, we’ll show you how to create an Invoice Calculator in Google Sheets using a simple example. By the end, you’ll have an easy-to-use tool that makes your invoicing process smooth and efficient.
Why Choose Google Sheets for Invoicing?
So, why should you consider using Google Sheets for your invoices? Well, there are several great reasons! First, it’s free and accessible from anywhere with an internet connection. This means you can manage your invoices on the go, whether you’re at home or out meeting clients. Additionally, Google Sheets offers powerful functions that make calculations straightforward, saving you time and hassle.
Example Data for Our Invoice Calculator
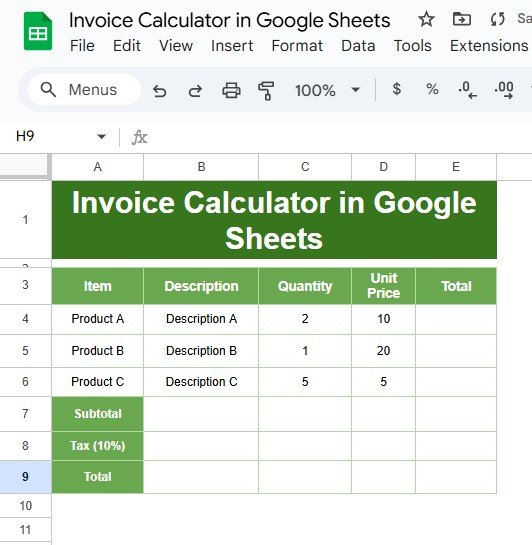
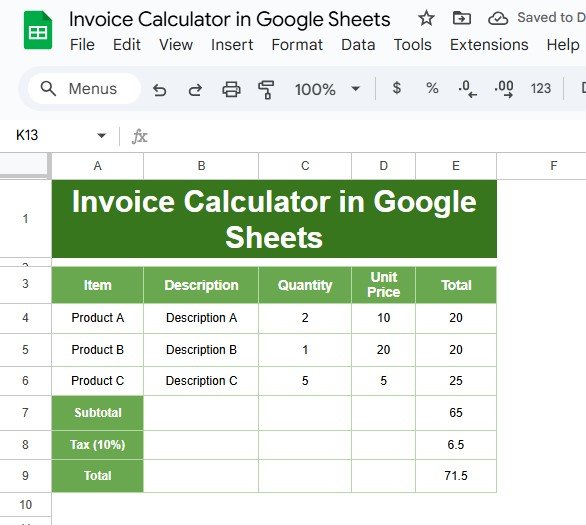
Let’s get started with the example we’ll be using. Here’s the data that will help us create our Invoice Calculator:
This table will be our foundation. Now, let’s jump into the steps to create your own Invoice Calculator!
Step-by-Step Instructions to Create the Invoice Calculator
- Set Up Your Spreadsheet
First things first, open Google Sheets and create a new document. Begin by entering the item names, quantities, and prices just like we have in the table above. This sets the stage for all your calculations.
- Enter the Formulas
Now comes the fun part—adding the formulas! This is where the magic happens.
- Calculating the Total for Each Product:
For Product A, enter the formula:
=C4*D4
This formula multiplies the quantity by the price per unit, giving you the total for that product. You can then drag this formula down to apply it to Product B and Product C, which makes things super easy!

- Calculating the Subtotal:
Next, you’ll want to calculate the subtotal. For that, use the formula:
=SUM(E4:E6)
This will add up the totals from all the products, giving you a grand subtotal.

- Calculating the Tax:
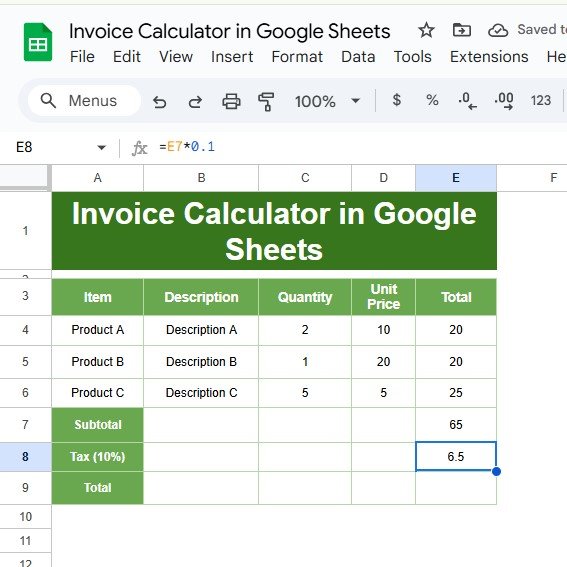
Now, let’s figure out the tax! Simply use the formula:
=E7*0.1
This takes the subtotal and multiplies it by 10% (or 0.1) to give you the tax amount.
- Calculating the Final Total:
Finally, to find out how much you owe in total, enter the formula:
=E7+E8
This adds together the subtotal and the tax to give you the final amount due.

Review Your Output
After entering these formulas, your invoice should look like this:
Benefits of Using an Invoice Calculator
Now that you’ve created your Invoice Calculator , let’s talk about some benefits you’ll enjoy:
- Accuracy: With automated calculations, you’ll minimize the risk of mistakes, which is always a win!
- Efficiency: Quick calculations mean you can focus on what really matters—growing your business!
- Customization: You can easily tweak your calculator as your business needs change, making it a flexible solution.
Conclusion
And there you have it! You’ve successfully built an Invoice Calculator in Google Sheets. With the example and formulas we’ve provided, managing your invoices has never been easier. If you enjoyed this guide, be sure to check out our YouTube video for a visual demonstration of the process!
Visit our YouTube channel to learn step-by-step video tutorials
Youtube.com/@NeotechNavigators


