Planning an event can be exciting, but let’s face it: it can also get overwhelming fast. From managing multiple teams and deadlines to juggling different priorities, there’s a lot that goes into making sure everything runs smoothly. But here’s the good news: a Google Sheets Event Planning Timeline Template can make your life a whole lot easier. Whether you’re organizing a wedding, corporate event, conference, or even a birthday party, a well-organized timeline can help you stay on track, meet deadlines, and avoid unnecessary stress.
In this guide, we’ll walk you through how to create a comprehensive event planning timeline in Google Sheets. Plus, we’ll show you how to use charts and data to stay on top of things, collaborate with your team, and make sure everything is running according to plan.
What Exactly Is an Event Planning Timeline Template in Google Sheets?
So, what’s an Event Planning Timeline Template? Well, it’s basically a document that helps you organize all the tasks for your event in one place, from start to finish. It allows you to list every task, assign responsibilities, set deadlines, and track progress. And the best part? Since it’s in Google Sheets, you can update everything in real time and share it with your team, making collaboration a breeze.
Google Sheets is a powerful, cloud-based tool that’s easy to use and totally customizable. It helps you stay organized and focused, whether you’re working solo or with a whole team. The flexibility of Sheets means you can tailor your timeline exactly to your event’s needs, making it an incredibly useful tool in event planning.
How to Create an Event Planning Timeline Template in Google Sheets
Creating your own event planning timeline in Google Sheets is quick and simple. Let’s break it down into easy steps.
Setting Up the Template
Getting started is easy. Here’s what you need to do:
- Open Google Sheets: Start by creating a new sheet in your Google Drive.
- Name Your Sheet: Title it something that makes sense for your event, like “Wedding Planning Timeline” or “Corporate Event Schedule.”
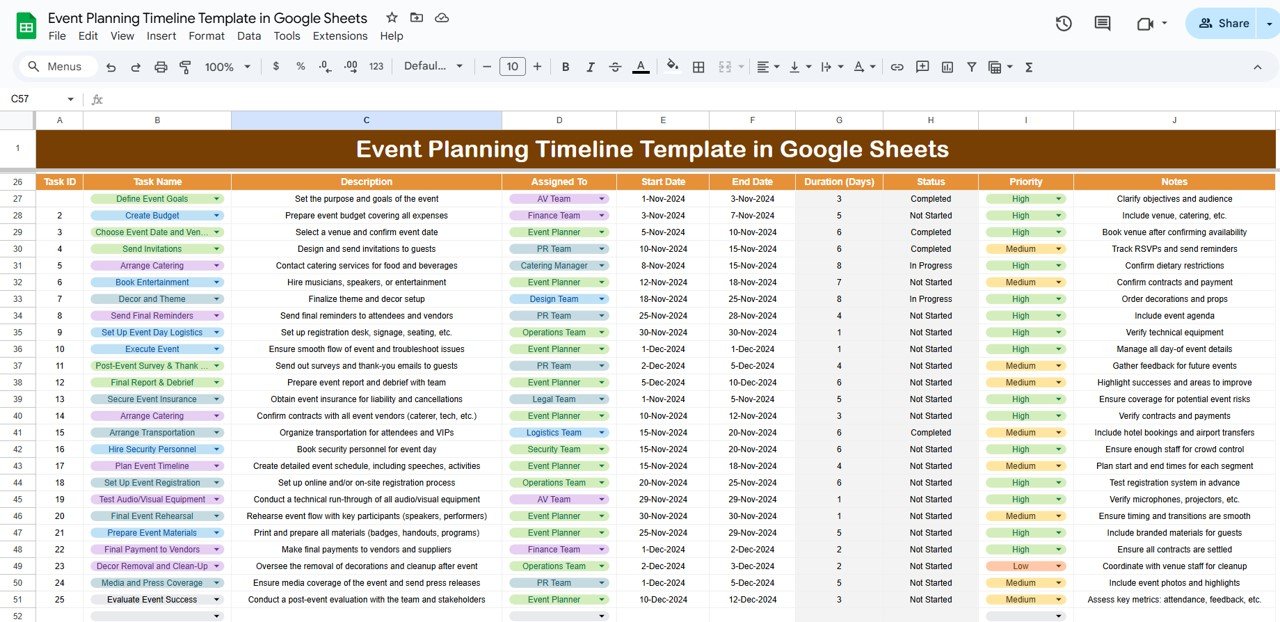
- Create Your Grid: Set up columns that will help you organize and track everything. Key columns to include are Task ID, Task Name, Description, Assigned To, Start Date, End Date, Status, and Priority.
Structuring Your Spreadsheet
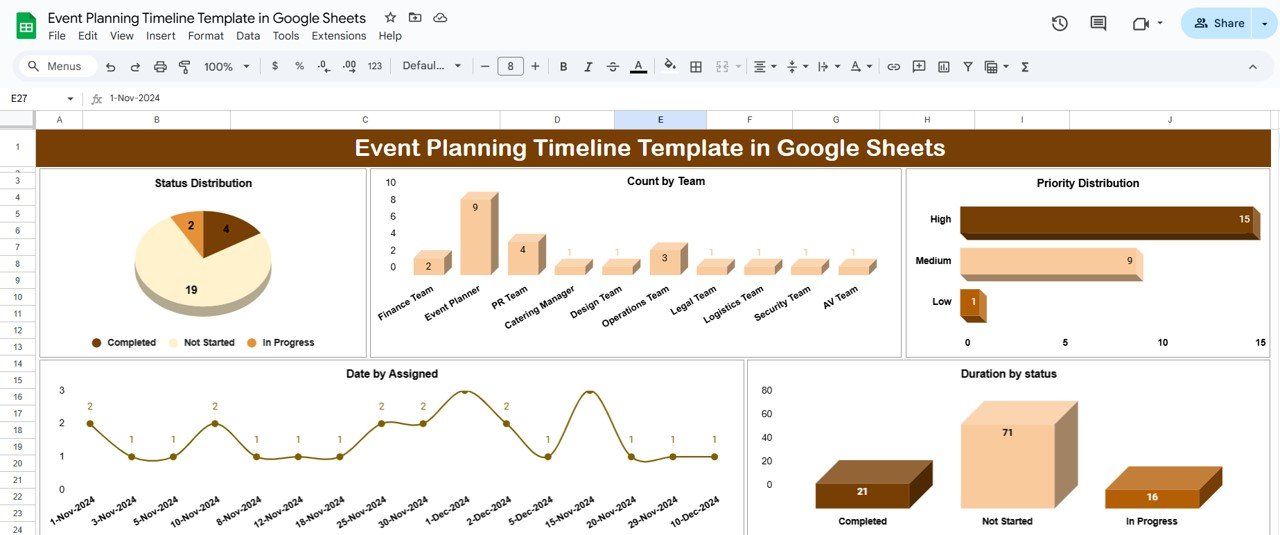
Now, let’s break down the structure of the template. Your event planning timeline will typically include two main sections:
- Top Section: This will feature charts that give you a quick snapshot of how things are going (status, priority, duration, etc.).
- Middle Section: This is where the bulk of your event details will go. It includes all your tasks, deadlines, and who’s responsible for what.
- The Top Section: Charts That Help You Stay on Track
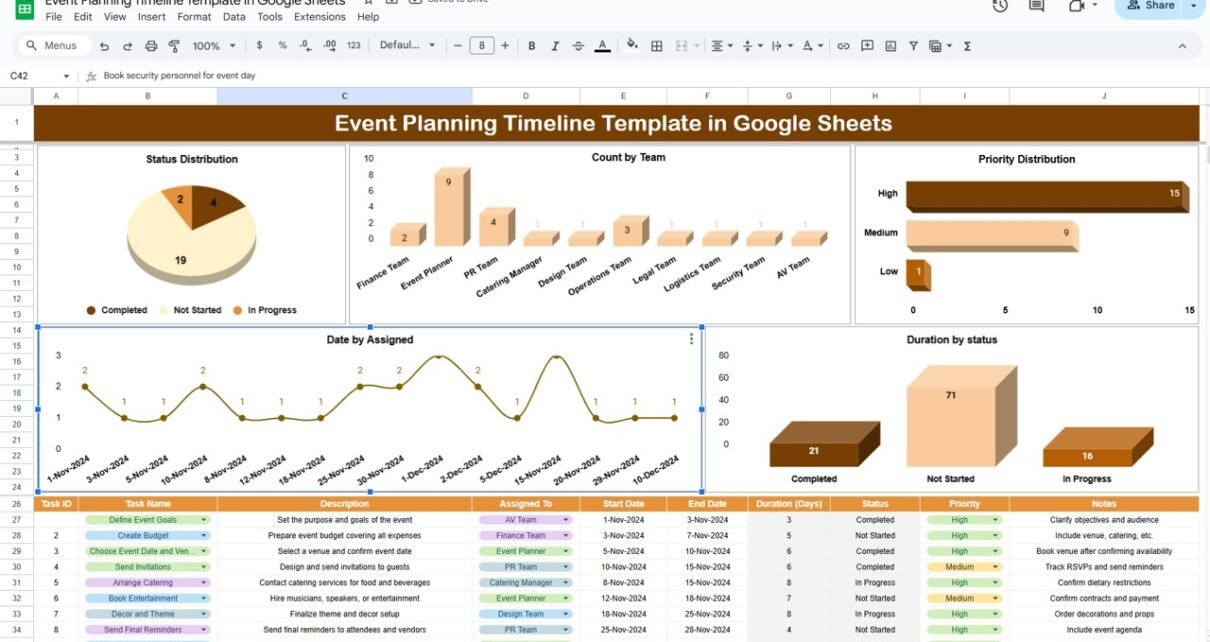
The top section of your Google Sheets template will include charts that provide a visual summary of your event’s progress. These charts help you quickly see how tasks are distributed across teams, how priorities are spread out, and whether everything is on track. Here are a few types of charts you’ll typically use:
- Status Distribution
This chart shows the overall status of your tasks. It helps you see at a glance how many tasks are. By looking at this chart, you can quickly spot any tasks that are lagging behind and take action to move them forward. For example, if a lot of tasks are marked as “Not Started,” you know it’s time to take a closer look and reassign or prioritize them.
- Count by Team
The “Count by Team” chart shows how many tasks each person or team has been assigned. This is super useful for ensuring that no one is overwhelmed with too many tasks and that everything is evenly distributed. If one team member has way more tasks than another, it’s a good indicator that you need to rebalance the workload.
- Priority Distribution
Here, you’ll be able to see how tasks are distributed across different priority levels, like:
- High Priority
- Medium Priority
- Low Priority
This chart helps you figure out if your most urgent tasks are getting enough attention. If you see a lot of “High Priority” tasks sitting undone, it’s time to take action and focus your efforts where they’re needed most.
- Duration by Status
This chart shows you how long tasks have been in progress and how much longer they are expected to take. It helps you track whether any tasks are falling behind schedule. For example, if a task has been “In Progress” longer than expected, this chart can help you pinpoint delays and adjust timelines if needed.
- Date by Assigned
The “Date by Assigned” chart shows when tasks were assigned and when they’re due. It’s especially helpful for keeping track of deadlines and ensuring nothing slips through the cracks. If you see tasks approaching their deadlines, you can take proactive steps to prevent last-minute rushes.
The Middle Section: Task Details
Now, let’s look at the middle section of the template. This is where you’ll enter the specifics of each task, like who’s responsible, when it needs to be done, and what the task entails. Here’s a breakdown of the columns to include:
- Task ID: Each task gets a unique Task ID to help you stay organized and easily reference tasks.
- Task Name: The Task Name is a brief, clear description of the task at hand. For example:
- Description: The Description gives you more details about what needs to be done. For instance, you might write, “Call XYZ Catering to confirm menu choices” or “Check with the venue on final setup arrangements.”
- Assigned To: The Assigned To column tells you who’s responsible for completing each task. This ensures accountability, so everyone knows what they need to do.
- Start Date: This is when you plan to start the task. Having a clear Start Date helps you allocate time effectively and keep everything on schedule.
- End Date: The End Date is when you aim to complete the task. With this, you can track how things are progressing and make adjustments if a task is falling behind.
- Duration (Days): Here, you’ll enter how long the task will take. This helps you estimate the total time needed to complete all the event preparation and plan accordingly.
- Status: This column tracks the current status of each task. You can mark tasks as:
Updating this regularly helps you keep a pulse on the progress of your event.
- Priority: Each task gets a Priority rating (High, Medium, or Low). This helps you focus on what’s most urgent and critical, ensuring that important tasks don’t get forgotten.
- Notes: The Notes section is where you can add any extra details or reminders about the task, like things you need to check, resources required, or dependencies on other tasks.
Advantages of Using an Event Planning Timeline Template
Using a timeline template in Google Sheets comes with a bunch of benefits that make event planning easier and more efficient. Here are some of the key advantages:
- Organization: The template helps you keep track of everything in one place, so you never miss a detail.
- Collaboration: Since it’s cloud-based, everyone on your team can access and update the sheet in real time, which makes collaborating a breeze.
- Transparency: With charts and visual data, everyone can quickly see the status of tasks, deadlines, and workloads.
- Accountability: When tasks are assigned to specific people, it’s clear who’s responsible for what. This helps avoid confusion and keeps the team accountable.
- User-Friendly: Google Sheets is easy to use, even if you’re not a tech expert. You don’t need to worry about complicated software.
Opportunities for Improvement in Event Planning
While a timeline template is a powerful tool, there’s always room for improvement. Here are a few ways you can level up your event planning:
- Automate Reminders: You can set up automated reminders or task updates with Google Sheets add-ons or integrate with Google Calendar to get timely alerts.
- Customize for Your Event: If you need additional features, like budget tracking or vendor management, you can easily customize your template.
- Advanced Reporting: For more detailed insights, use tools like Google Data Studio to create dashboards and reports that track your event’s progress in real time.
Best Practices for Event Planning with Google Sheets
To make the most out of your event planning timeline, keep these best practices in mind:
- Regularly Update the Sheet: Update the task status and timeline frequently to keep everything on track.
- Color-Code Tasks: Use color-coding to highlight high-priority tasks or overdue items, so they stand out.
- Set Clear Deadlines: Ensure every task has a specific start and end date to stay on schedule.
- Communicate with Your Team: Regular communication is key. Make sure your team knows what they’re responsible for and when things need to be done.
Conclusion
Using an Event Planning Timeline Template in Google Sheets is a game-changer for keeping your event organized, on track, and stress-free. By breaking everything down into manageable tasks, tracking progress with charts, and collaborating with your team, you’ll be able to tackle any event with confidence. Plus, with Google Sheets, it’s easy to make updates on the go, ensuring that you’re always in control.
Visit our YouTube channel to learn step-by-step video tutorials
Youtube.com/@NeotechNavigators
