Have you ever needed to quickly add or subtract months from a specific date in Google Sheets? The EDATE function is the perfect tool for this task! Whether you’re managing project deadlines, loan schedules, or any other time-based tasks, the EDATE function makes it easy to adjust dates accurately. In this blog post, we’ll walk you through how to use the EDATE function in Google Sheets with a step-by-step example.
By the end of this guide, you’ll be able to calculate future or past dates effortlessly!
What is the EDATE Function in Google Sheets?
The EDATE function allows you to return a date that is a specific number of months before or after a given date. It’s ideal for calculating due dates, expiration dates, or projecting future timelines.
=EDATE(start _date, months)
- start _date: The date from which you want to add or subtract months.
- months: The number of months you want to add (positive number) or subtract (negative number).
Now, let’s dive into an example to see how this works in real-life scenarios.
Data for Our Example
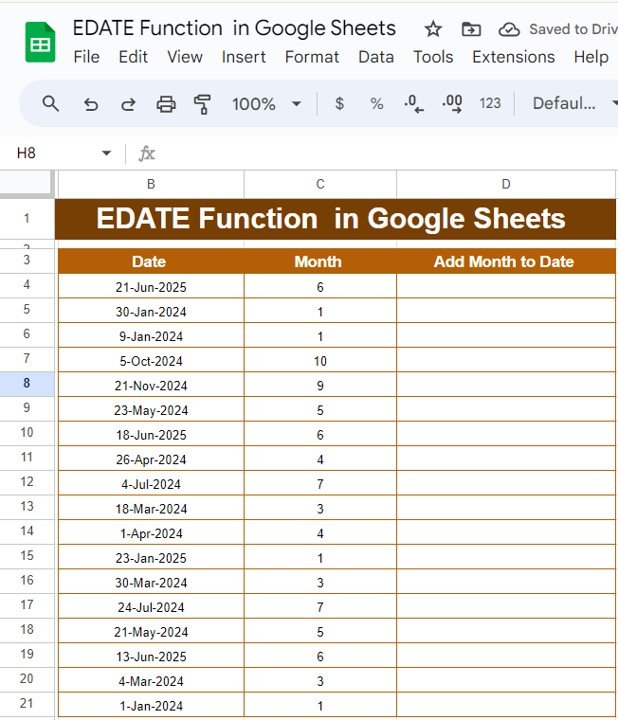
Below is a dataset that includes a starting Date, the number of Months to add, and the column where we will calculate the Add Month to Date using the EDATE function:
In this example, we will use the EDATE function to add months to the dates listed in column B based on the number of months in column C.
How to Use the EDATE Function
Set up your data:
Ensure you have your data structured as shown in the table above, with the dates in column B and the number of months to add in column C.
Enter the EDATE formula:
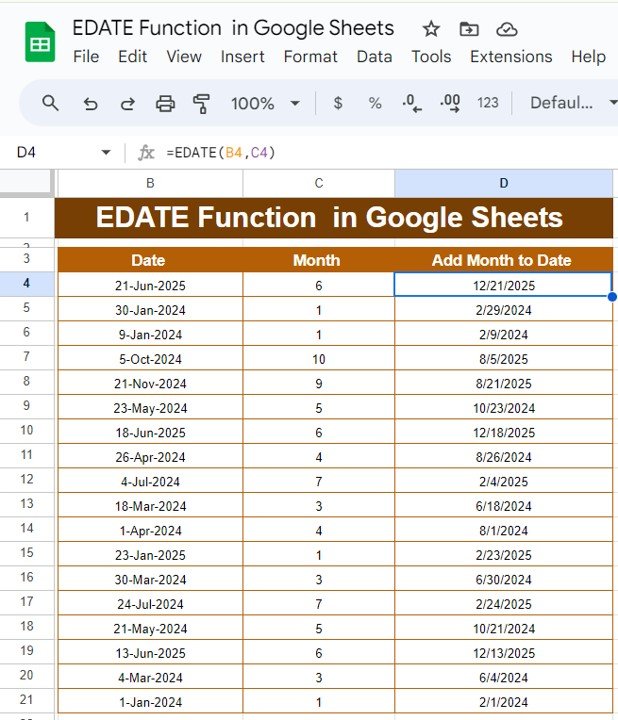
In the first cell of the “Add Month to Date” column (D4), type the following formula:
=EDATE(B4, C4)
This formula adds the number of months in cell C4 to the date in cell B4.
Drag the formula down:
Once you’ve entered the formula, drag it down to fill the rest of the column. This will apply the formula to all rows, giving you the updated dates.
Explanation of the Formula
Let’s break down the formula:
=EDATE(B4, C4)
- B4: This cell contains the starting date.
- C4: This cell contains the number of months you want to add to the starting date.
- EDATE(B4, C4): The EDATE function then adds the months from C4 to the date in B4, returning the new date.
For example:
If B4 is “21-Jun-2025” and C4 is “6”, the formula returns “21-Dec-2025”.
Output Example
Once you apply the formula across the dataset, here’s what your output will look like:
This formula makes it incredibly easy to calculate future or past dates by simply changing the number of months in the Months column.
Advantages of Using the EDATE Function
- ✅ Saves time: Quickly calculate future or past dates without manually adjusting the calendar.
- ✅ Simple to use: The function requires only two arguments—start date and months.
- ✅ Highly adaptable: Use it for scheduling, project management, and deadline tracking.
Conclusion
The EDATE function is a valuable tool in Google Sheets that allows you to easily calculate dates months before or after a given date. Whether you’re managing deadlines, scheduling events, or simply need to adjust dates, this function is your go-to solution for accurate and efficient date calculations.
Want to build skills like this step by step? The Excel AI Mastery: 100 Formulas course on NextGenTemplates Academy has date and time formulas with practice files.
View this post on Instagram
Make a copy of the free practice file to follow along.